
So you’ve been managing your WordPress blog via the WordPress.com platform for a while, and you’re ready to take the next step?
You’re ready to strengthen your brand, grab your own domain, create branded email accounts and have greater control over your site? Look no further, move to a self-hosted version of WordPress!
1. Secure your domain
It might seem like a scary thought if you don’t feel so confident with all things IT but it’s really not as scary as it seems. Securing a domain name basically gives you a professional brand address for your blog. Many bloggers start out on free blogs like WordPress, which is an awesome place to start. However, do you really want to tell people to visit your blog when your web address is myamazinglifeblog.wordpress.com?
Why not make it easier for the end-user? Use myamazinglifeblog.com!
So your next question will most likely be, “Well how do I do this?”.
The answer is simple, visit our site and search for your desired domain name. Once you find one that you’re happy with, and that is free to register (i.e. It hasn’t already been registered by somebody else), order it!
2. Link it up
So the next step is getting your existing blog linked up. You’re currently sitting with a wordpress.com blog, but you want to have your own domain name? You’ve got two options:
Option 1 (In our opinion, the better option by far!):
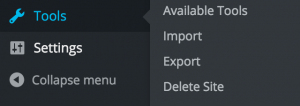
Visit your WordPress.com site Dashboard. From the toolbar on the left, click Tools > Export.
Once you’ve selected ‘Export’ from the ‘Tools’ section of the WordPress Admin toolbar, you’ll be present with this page. Click ‘Start Exporting’ on the Free Export option.

Choose ‘All Content’ from the list of options and then click ‘Download Export File’.
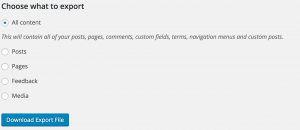
You’re site content will start downloading as an .XML file.

You’ve now grabbed your content and you’re ready to get set up with a self-hosted version of WordPress. You’ll need some server space to do this. You can obtain server space by purchasing a hosting package along with your domain – details of our hosting accounts can be found here.
Install WordPress using our ‘Fantastico DeLuxe’ tool from within your hosting account’s control panel, or ask our support team to install WordPress for you.
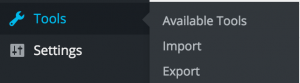
Once you’re set up and good to go, simply Import your content back in, using the WordPress Import options. To do this, log into your WordPress Admin Dashboard and select ‘Tools’ > ‘Import’.
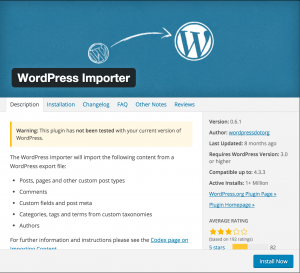
Next, select ‘WordPress’ from the table…

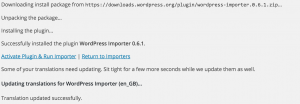
Download and install the WordPress Importer by clicking ‘Install Now’.
From the Install log, click “Activate Plugin & Run Importer”…
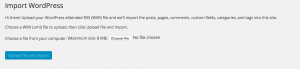
Click ‘Choose File’ and search for your XML file which you downloaded from WordPress.com. Once you’ve located the file, click ‘Upload File and Import’.
Your content is now live, and you can start installing themes and customising the look of your site!
Since you’ve also got hosting
Option 2:
You can leave your blog on WordPress.com and we can set up a redirect for your new domain name. That means that when anybody visits your new domain, myamazinglifeblog.com, they’ll be taken to your blog (which would direct them to myamazinglifeblog.wordpress.com).
3. Finito!
It’s really that simple! What’s better is that we can guide you through it – so go on… purchase your domain and hosting today and reap the rewards of a self-hosted WordPress blog! Email info@broadbandcloudsolutions.co.uk to get started today!
Are you looking for branding or bespoke web design? Look no further! Our sister company NSDesign is an award winning, full-service digital agency who work in partnership with us here at Broadband Cloud Solutions. Check them out!
Leave a Reply
